Wednesday, September 18, 2013

Use Picasa Photos As Your Computer Screensaver

Picasa Logo


Your screensaver can display many different types of images, but if you want to personalize it a bit, you can use your Flickr or Picasa albums as your computer screensaver. Flickr offers an RSS feed with photos, but to integrate it with Windows, you need a suitable screensaver that uses data from an RSS feed. For this, you can use Google Photos Screensaver, which you can download with Picasa.

This Is The Way……..
While installing Picasa, remember to deactivate all unnecessary settings or the viewer if you do not want to use it. After the installation, navigate to C:\windows\system32 and look for the file "gphotos.scr".

Create a backup copy of this file in another location. If you do not want to use Picasa, you can uninstall the program. Once you're done, copy the backup file "gphotos.scr" to the system folder once more.

To set up the screensaver, click on Appearance and Personalization in the control panel and then on Change screensaver in the Personalization section. Now, select Google screensaver from the drop-down box and click on Settings.

Here, click on the Configure button to activate sources for the screensaver, including "Picasa", "Photos from specific folders on my computer", or "Photos from public websites".

You can specify the sources for each option with the Configure button. To set your Flickr images, click on Photos from public websites and then on Configure. Now enter the URL for the Flickr feed in the Other photo feed sources box and click on Add.

After a short test, the entry will appear in the list and inform you of whether it can access Flickr. You can add and activate several feeds to add different sources. Confirm the changes with OK. Lastly, set the visual effects, the time each image should be displayed and choose to display captions. Close the dialogue by clicking on the OK button.

Keep In Mind…………………
 The feeds load only 20 images and stores them temporarily on your machine. To get new images again, you must empty the Cache folder in your user profile regularly.

To do this, open the user profile in Windows Explorer and navigate to the folder "AppData\Local\ Google\GBScreensaver\imgcache". Delete the existing JPG files so that new ones are automatically loaded.

If you want this tutorial with pictures, please let me know.

Remove Old Drivers From Windows Successfully

Windows Drivers
Remove Drivers Of Old Device

If you repeatedly get errors while installing your new printer, scanner or MFD, you might need to delete the drivers of the old device from Device Manager, and start the process all over again. Windows only shows active devices in the device manager, and to remove the drivers of the old printer or scanner, you must connect the device again to the PC. If this is not possible, the invisible devices will stay hidden.

To delete the old drivers, press Pause/Break  when holding down the Windows button. If you don't see Pause button on your keyboard, not worry, most laptops don’t have it. Go to run and type ‘Keyboard’. You will see virtual keyboard on the list, click on it. This will open up on-screen keyboard. Hold Windows button on the real keyboard and press Pause button on the on-screen keyboard (now don't ask me how to do that).

This will throw up the System Properties window. Click Advanced System Settings, which is on the left side. This will open up ‘System Properties’. Click on Environment variables on the bottom right. Now click New.

In the next Window, type “devmgr_show_nonpresent_Device” next to Variable name and type the number “1” in the field next to Variable value. Close the window, click the OK button on the System Properties window and  restart the computer.

Once the computer restarts, press Pause/Break when holding the Windows button again. In the next Window, click on Device manager. In the following window, go to View and activate Show hidden devices. Now the devices that are not connected will appear, but the rogue drivers are still installed. Right-click on the concerned device in the Device Manager and uninstall it along with its drivers.


Monday, September 16, 2013

Difference Between 32-bit and 64-bit OS

32-bit And 64-bit OS
Don't Know The Difference?

Many people still don't know the difference between 32-bit and 64-bit OS. 32-bit and 64-bit refer to nothing but the way in which the processor handles information. The main difference between the two types is the amount of RAM that can be handled effectively.
For example, the 32-bit version of Windows can use only up to 4GB of RAM. 64-bit version of Windows on the other hand can easily use up to 128GB of RAM.

It is possible to install 32-bit programs on a 64-bit OS. But it won't make any difference to the software. Don't expect any boost in speed for the software

Friday, August 9, 2013

Changing The VLC Media Player Skin

VLC is the most popular media player across all platforms. But it doesn't boast of a impressive Graphical User Interface (GUI). You can apply your own custom skin on your VLC player to make it look impressive. Skins can be downloaded for free from www.videolan.org.

Changing VLC Skin

Here are the steps to do it:

  • Download the file which is 37MB, which includes all the skins available.


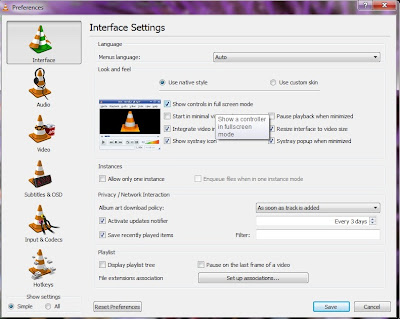
  • Click ‘Tools’ , ‘Preferences’ , ‘Interface’  and select the custom skin option. Select the skin you want to apply by clicking on the Choose button. 

Changing The VLC Media Player Skin

If you want to customize the GUI layout and interface you can play around with the button positioning etc by simply going to ‘Tools’ ‘Customize Interface’.


Monday, August 5, 2013

Make Websites Comfortable To The Eyes

Many websites display dark text on a white background. For many people, there is no problem in it. But for some people, who got floaters in their eyes ( including me) staring at the white background for too long gives strain to the eyes. It’s really frustrating; it feels like staring at a light bulb.

Don’t worry, there is a tool that makes website display dark theme. It’s a Google chrome extension called ‘Hacker Vision’. Just search for ‘Hacker Vision’ in chrome store and install it. After installing, just surf web sites as you usually do. To switch back to normal, click on ‘h’ on top right and choose ‘Normal’. If you want to pause it, click ‘Pause Hacker Vision’.


That’s It!

View Multi-Page Articles On One Page

Many websites when displaying their content, like ‘Top 10 Movies Of 2012’ or ‘Top 10 Places To Visit’; they  display one heading on each page. They do this to maximize your exposure to advertisements and increase their number of page views. But to continuously click next is a pain. Even to see the previous heading, you have to click back. This all takes lot of time.


‘PageZipper’ is chrome add-on which merges all the ‘next’ pages into one page. The add-on can be found on top right of the browser after you install it.


Search On Multiple Search Engines At Once

Google is the top search engine, no doubt about that. But sometimes it’s better to try out different search engine to know if it produces better results. Multi-Search is an add-on of chrome that lets you search a word at different search engines at one place.


When on any website, highlight a word and right click. Click on multi-search and there will be multiple search engines options. You can choose to search on any search engine.

Multi-Search

Prevent Websites Tracking You

Modern web browsers have an option that prevents websites from tracking you. But AVG Do Not Track (chrome add-on) is a more better option as it is more advanced. After installing just surf websites as you usually do. To see trackers click on the icon as shown in the diagram. You will be able to see what items are tracking you.


You can block all the items that track you. This is especially good, if you are using blogger. You can stop blogger from tracking your own pageviews.

AVG Do Not track

Remix Websites!

So, you want remix websites uh? It’s easy as installing an add on.

So, here are the steps to remix websites:

  • Go to  http://www.hackasaurus.org and follow the on-screen instructions to know how to remix their website to begin with.
  • Then click on ‘Install’ on bottom left as shown in the diagram.
Hackasaurus


  • That’s it! Follow the instructions on the webpage to enable your browser’s bookmark and how to drag X-ray goggles to your bookmark toolbar.
  • When remixing websites, press H, to know more features.

Have fun! But remember that it won’t work with internet explorer. You need to have Google Chrome, Firefox or Safari. It’s just fun to change headlines. Here is my own:


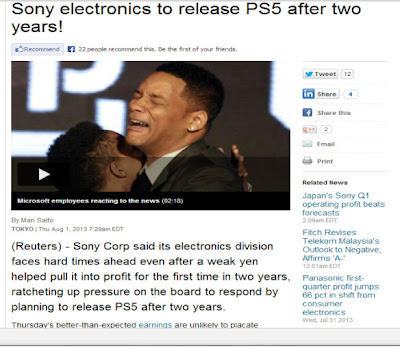
Web Remix